Hello, everyone! In this post I will be showing my database systems final project that I have been working on with my group which is James Barlian and Nixon Louis. The three of us have made a working program to run on a small business that sells footwear using MySQL database and Visual Basic.
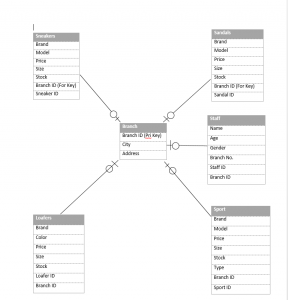
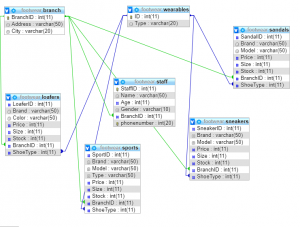
The first step to our project, we designed our database to our vision by making how many tables we are going to use and making the contents as minimal as possible. We originally made 6 tables which are :
But we ended up with 7 tables and their datas which are :
Branch(BranchID, Address, City)
Primary Key BranchID
Auto Increment BranchID
Staff(StaffID, Name, Age, Gender, BranchID, PhoneNumber)
Primary Key StaffID
Foreign Key BranchID references Branch(BranchID)
Auto Increment StaffID
Wearables(ID, Type)
Primary Key ID
Auto Increment ID
Sneakers(SneakerID , Brand, Model, Price, Size, Stock, BranchID,ShoeType)
Foreign Key BranchID references Branch(BranchID)
Foreign Key ShoeType references Wearables(ID)
Sandals(SandalID , Brand, Model, Price, Size, Stock, BranchID, ShoeType)
Foreign Key BranchID references Branch(BranchID)
Foreign Key ShoeType references Wearables(ID)
Loafers(LoaferID , Brand, Color, Price, Size, Stock, BranchID, ShoeType)
Foreign Key BranchID references Branch(BranchID)
Foreign Key ShoeType references Wearables(ID)
Sport Shoes(SportID , Brand, Model, Type Price, Size, Stock, BranchID,ShoeType)
Foreign Key BranchID references Branch(BranchID)
Foreign Key ShoeTypereferences Wearables(ID)
After developing our database, we connected it to visual basic and created our program that is able to read, write, delete and update our database which we will show below.
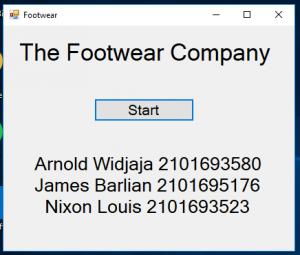
This is basicly the first page of the program opened. Clicking the start button will redirect us to the main page.
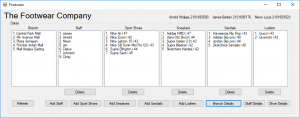
This is the main page of the program where we can see a summary of all our data that are in our databases in each boxes. All of our datas in the database is shown here in this page. From this page. we can go to 8 different pages which are used to either add items to the database or see details for each category. We can also delete items from this page by selecting one of the items from the table and click their respective delete buttons below the table.
As you can see on the picture, the tables that show footwear has a number on their right that represents the size of the shoes that are available. If one of the shoes with a particular size has no stock, that shoe with the size will not be shown in this table so we can have a quick glance on what is available. If we need more information about the footwear, we can go to shoe details to see specifically on their information.
Add Section
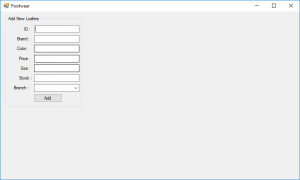


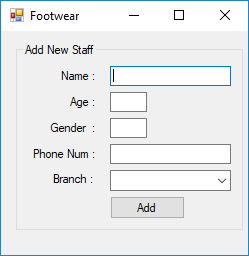
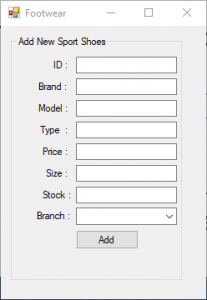
For adding, we need to decide first what we want to add and click the correct option. So if we want to add staff, we need to click “Add Staff” and will be redirected to the respective page. In these “Add” pages, we can add a specific item to our database by typing in the information about the shoe. After typing the complete information and adding it, we need to refresh our main page so that the data will be shown in the main page.
For the option to add branch, we decided to put it on the branch details section because a regular staff should not have access to the Add Branch and we decided to hide it and not put it in the main page.
Details Section
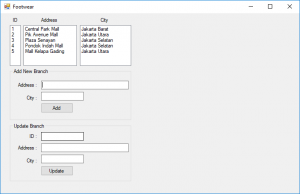
Branch
On this page, we have listboxes which show the data of the branches that starts from the branchID, Address and City, we also have the option to add or update the branch from this page by filling in the textbox. For update, we need to fill with the ID we want to change and fill in the new information for the address and city to update.
Staff
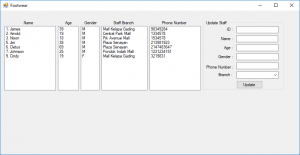
On this page, we have listboxes which show the data of the staffs that starts from the name,age, gender, staffbranch and phonenumber. We can also update on this page by filling the old id and fill the new information on the other textboxes.
Shoes
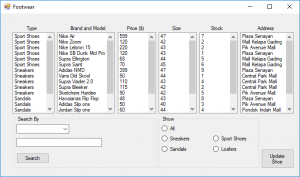
On this page, we have listboxes which show the data of the shoes that starts from type, brand and model, price, size, stock, and the place where it is stored.
If there are too much data on the listboxes, we have 2 options to reduce the amount of data. We can sort by choosing the category from the listbox on the bottom left or we can also search by using the box on the left to choose which category we want to search by and type the search.
In this page, we can also update shoe which will redirect us to this page.

This page will allow us to update an information on a shoe that we want to alter its information by typing the old information and the new information in their respective textboxes and when done, we can just click the respective update buttons and it will be updated.
That’s it for my program. Thank you for taking the time to read my post and I hope my post is useful for you. I will write again soon.